Changing your Page name on Facebook can be a crucial step in keeping your online presence relevant and engaging. Whether you’ve noticed a typo or want to better reflect your brand’s identity, the process is designed to be user-friendly. To successfully change a Page name on Facebook, you must have the right permissions, which most admins do. In this guide, we’ll walk you through the steps for a Facebook Page name change, ensuring you understand how to navigate Facebook settings to change Page name effortlessly. With just a few clicks, you can edit your Facebook Page name and enhance your brand’s visibility.
The ability to modify your Facebook Page title is essential for maintaining an accurate representation of your business or community. If you’ve been searching for ways to update your Facebook business page name, you’re in the right place. This guide will explore how to change Facebook Page name effectively, detailing the necessary steps and permissions required. Additionally, we’ll cover alternative methods for editing your Facebook Page name, ensuring you have all the information needed to make this important update. Stay tuned as we unravel the straightforward process of changing your Page name on Facebook.
Understanding Facebook Page Name Change Policies
Before diving into the process of changing your Facebook Page name, it’s essential to understand the platform’s policies regarding name changes. Facebook has specific guidelines that you must follow to ensure your request is approved. Generally, your Page name should reflect the content and purpose of your business or community. Avoid using misleading terms or symbols, as this could result in your request being denied. If your Page has a substantial following, frequent name changes might confuse your audience, so it’s best to choose a name that aligns closely with your brand identity from the start.
Additionally, Facebook requires that the new name accurately represent your Page’s subject matter. If you are altering the name to better suit your business, make sure it is descriptive and straightforward. You may also encounter restrictions based on your Page category. For instance, Pages representing established businesses or organizations must maintain a professional appearance. Familiarize yourself with Facebook’s guidelines to make the name change process smooth and successful.
Step-by-Step Guide to Change Your Facebook Page Name
Changing your Facebook Page name can seem daunting, but it’s a straightforward process when you follow the required steps. First, log into your Facebook account and navigate to your Page. Ensure you have the proper admin rights; otherwise, you won’t be able to make changes. Once on your Page, click on your profile picture, then select ‘See all profiles’ to locate the Page you wish to edit. From there, access the settings by clicking on ‘Settings and privacy’ and then ‘Settings.’ This is where the name change journey begins.
In the settings menu, search for the ‘Page setup’ option and click on ‘Name.’ Here, you can proceed to click the ‘Edit’ button next to your current Page name. Enter your new name in the provided field, ensuring it meets Facebook’s criteria. After updating your Page’s name, click ‘Review change,’ and enter your password to submit the request. Remember, Facebook will typically take up to three business days to review and approve your request.
Troubleshooting Common Issues When Changing a Page Name
Even with the right permissions, you may encounter issues when trying to change your Facebook Page name. One common problem is having insufficient access rights. If you find yourself unable to make changes, check whether you have the necessary admin rights. If you only possess ‘task access,’ you need to reach out to the Page owner to upgrade your permissions. This can be a simple conversation that allows you to gain the access required to perform the name change.
Another issue could arise from Facebook’s review process. If your name change request is denied, it might be due to policy violations. Make sure your new Page name is clear and directly linked to your business. If you’ve made multiple changes in a short period, Facebook may be hesitant to approve further requests. In such cases, consider waiting some time before attempting to change the name again. Always review the guidelines before proceeding to minimize these hurdles.

Alternatives to Changing Your Facebook Page Name
If you’re unable to change your Facebook Page name for any reason, there are alternative approaches you can take to enhance your Page’s visibility. One option is to focus on updating your Page’s description and about section. This allows you to convey your brand’s values and offerings more clearly, which can help mitigate confusion about the Page’s focus if the name cannot be changed. A well-crafted description can attract the right audience even if the Page name remains unchanged.
Additionally, consider creating engaging content that resonates with your target audience. Regular posts, community interactions, and promotional events can boost your Page’s presence on Facebook. Encourage followers to provide feedback, which can be invaluable in refining your brand’s image and messaging. While changing the Page name is beneficial, consistently providing value to your audience can be just as impactful.
Changing Your Facebook Business Page Name: Key Considerations
When running a business on Facebook, changing your Page name requires careful consideration. Your business name is often the first impression new visitors will have, so it’s vital that any changes align with your brand’s identity. Think about how the new name fits within your existing marketing strategy. It should resonate with your target audience and clearly communicate what your business is about.
Furthermore, consider the potential impact of changing your business name on your SEO and online visibility. A well-optimized name can help improve your Page’s searchability on Facebook and Google. If you’re changing your business model or target demographic, ensure that the new name reflects these changes appropriately. Always keep your branding consistent across all platforms to maintain a cohesive identity.
How to Edit Your Facebook Page Name Efficiently
Editing your Facebook Page name efficiently involves understanding the platform’s settings and streamlining your approach. Start by gathering all necessary information and permissions before you log in. This preparation allows you to avoid unnecessary delays. As you navigate through Facebook settings, familiarize yourself with the layout to quickly access the ‘Page setup’ and ‘Name’ sections. A clear plan can significantly enhance your efficiency.
Once you’re ready to make changes, consider drafting a few potential names before submitting your request. This way, if your first choice is rejected, you’ll have alternatives ready to go, minimizing wait time. Always ensure that your proposed names adhere to Facebook’s naming policies to improve your chances of approval. By being organized and proactive, you can streamline the name change process and keep your Page updated with minimal disruption.
After Changing Your Facebook Page Name: Best Practices
After successfully changing your Facebook Page name, it’s crucial to implement best practices to maintain engagement and clarity with your audience. First, inform your followers about the name change through a dedicated post. Explain the reason behind the change and how it better represents your brand. This transparency can help retain your audience’s trust and interest.
Additionally, update all marketing materials and online profiles to reflect the new Page name. Consistency across your branding helps prevent confusion among your audience. Keep an eye on audience engagement after the change; monitor interactions and feedback to gauge how well the new name is being received. Adjust your strategies accordingly to ensure that your brand continues to resonate with your target demographic.
The Importance of Choosing the Right Name for Your Facebook Page
Choosing the right name for your Facebook Page is crucial for establishing a strong online presence. A well-thought-out name not only reflects your brand but also aids in search visibility. Including relevant keywords related to your business can enhance your Page’s discoverability, making it easier for potential customers to find you. This is particularly important for businesses, as a clear and descriptive name can lead to increased traffic and engagement.

Moreover, the name you choose sets the tone for your branding and marketing efforts. It influences how current and potential customers perceive your business. A catchy, memorable name can attract more followers and encourage word-of-mouth referrals. Therefore, take the time to brainstorm and select a name that captures the essence of your brand while aligning with Facebook’s guidelines.


Navigating Facebook Settings to Change Page Name Effectively
Navigating Facebook settings to change your Page name effectively requires a good understanding of the platform’s interface. Start by logging into your account and accessing your Page settings. Familiarize yourself with the layout to quickly locate the ‘Settings and Privacy’ section. Knowing where to find important options like ‘Page setup’ will save you time and reduce frustration when making changes.
Additionally, utilizing the search function within Facebook settings can expedite the process. Typing ‘Page setup’ directly into the search bar will lead you directly to the relevant area. This is especially helpful if you’re managing multiple Pages or if Facebook updates its interface. By adopting these strategies, you can streamline the name change process and focus on what matters most: engaging with your audience.
Frequently Asked Questions
How do I change my Facebook Page name?
To change your Facebook Page name, log into your account, select the Page, go to Settings and privacy, then Settings. Find Page setup, click Name, and hit Edit to update your Page’s name. After entering your password, submit your request.
What are the steps to edit my Facebook Page name?
To edit your Facebook Page name, access your Page settings by selecting Settings and privacy, then Settings. Search for Page setup, click Name, and choose Edit. Enter your new Page name and your password to submit the change.
Can I change my business Page name on Facebook?
Yes, you can change your business Page name on Facebook. Follow the same steps for changing a regular Page name by going to Settings, selecting Page setup, and editing your name. Make sure you have admin rights to request the change.
Why can’t I change my Facebook Page name?
If you cannot change your Facebook Page name, it may be due to limited access permissions. Ensure you have admin rights for the Page. If you only have task access, contact the Page owner to request full permissions.
How long does it take to change a Facebook Page name?
Typically, it takes Facebook around three business days to review your request for a Page name change. You will receive a notification once the change is approved or if further action is needed.

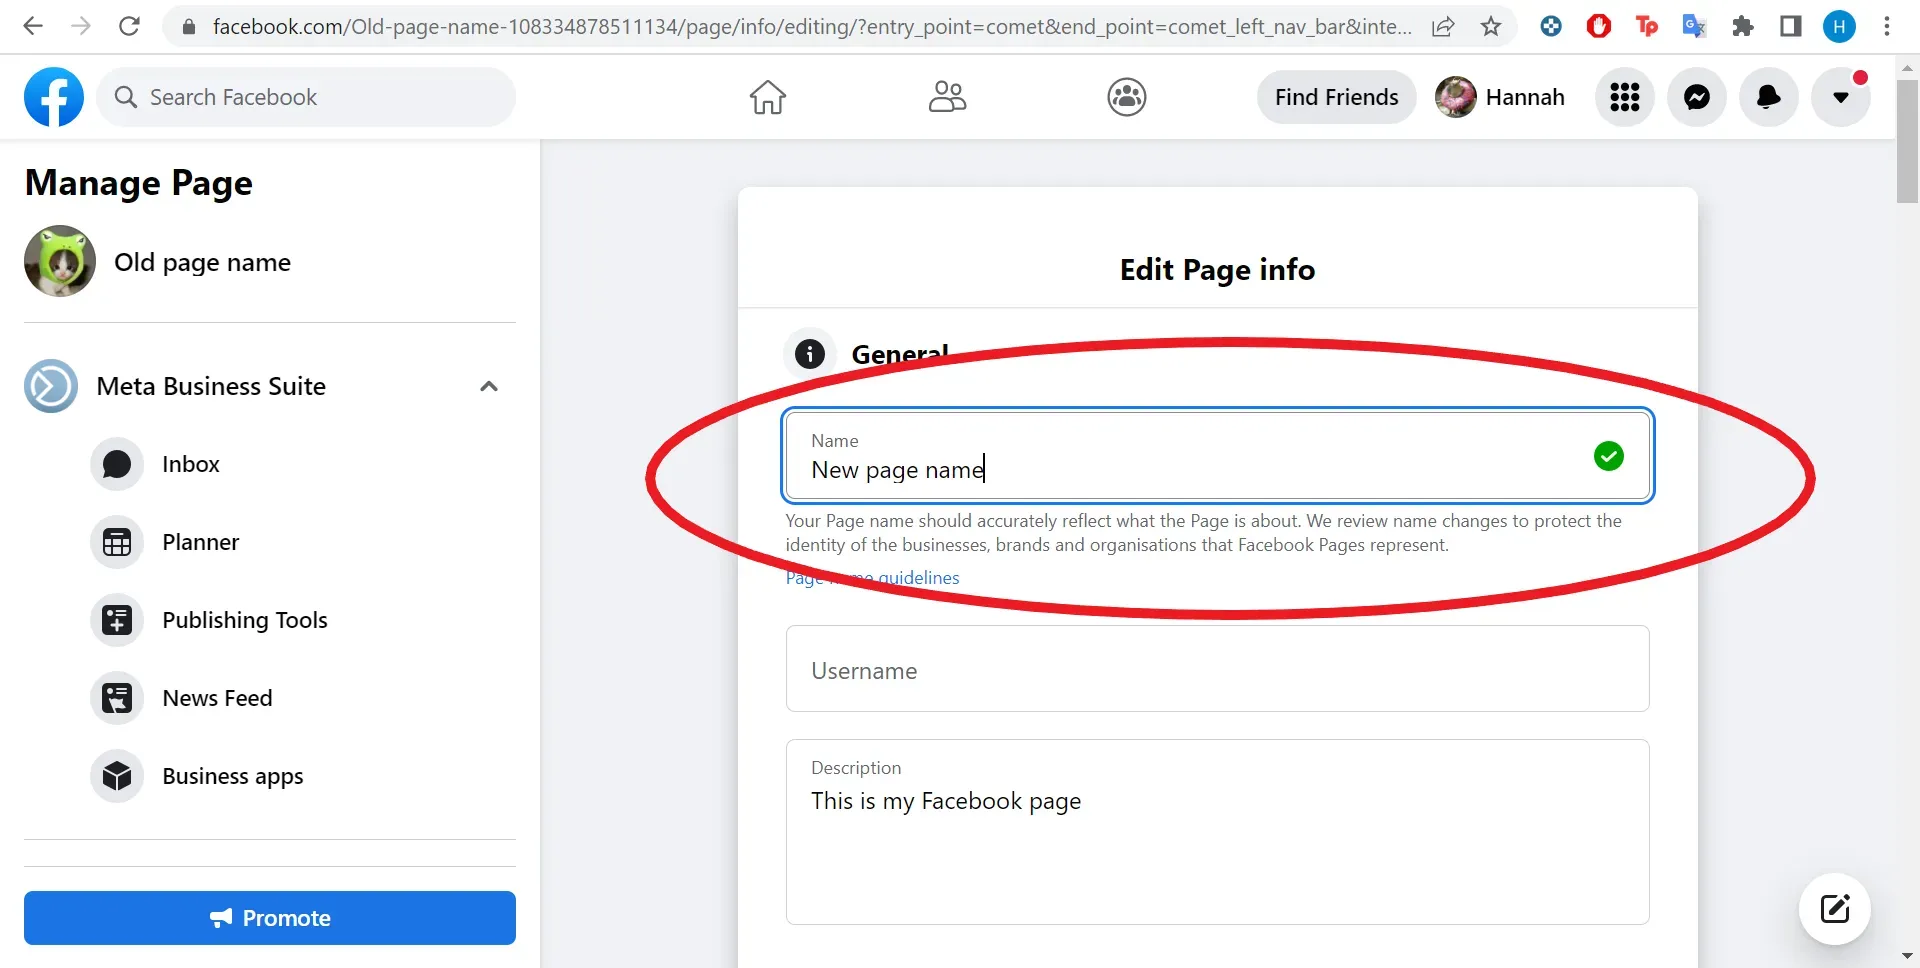
What if I want to change the name of a Classic Facebook Page?
To change the name of a Classic Facebook Page, navigate to your Page, scroll down to Edit Page Info in the left panel, enter your new name, and click Request Change.
How do I change my Facebook Page link?
To change your Facebook Page link, you need to change your Page’s username. Go to Settings, then Page setup, click Edit next to Username, and enter your new username before saving changes.
Is there a limit to how many times I can change my Facebook Page name?
Yes, Facebook has restrictions on how often you can change your Page name. It’s best to choose a name carefully, as frequent changes may lead to the inability to change it again for a period.
What permissions do I need to change a Facebook Page name?
To change a Facebook Page name, you need to have admin rights for that Page. If you don’t have these permissions, you will need to contact the Page administrator for assistance.
What if my Facebook Page name change is rejected?
If your Facebook Page name change is rejected, review the guidelines for Page names to ensure compliance. You may need to revise your proposed name and submit another request.
| Step | Action | Notes |
|---|---|---|
| 1 | Log into Facebook | Ensure you have admin rights. |
| 2 | Click on your profile picture | Located at the top right corner. |
| 3 | Choose ‘See all profiles’ | Under your name and profile picture. |
| 4 | Select the Page you want to switch to | Make sure it’s the correct Page. |
| 5 | Click the Page photo | Similar to your profile picture. |
| 6 | Select ‘Settings and privacy’ | Under your profiles list. |
| 7 | Click ‘Settings’ | Under Settings and privacy. |
| 8 | Search for ‘Page setup’ | Use the search bar for quick access. |
| 9 | Click ‘Name’ | To edit the Page name. |
| 10 | Click ‘Edit’ | Next to your Page name. |
| 11 | Update your Page’s name | Click ‘Review change’ when done. |
| 12 | Enter your password | To confirm the change. |
Summary
To change the Page name on Facebook, you need to follow a series of straightforward steps involving your profile and settings. This change is crucial for maintaining your brand identity or the correct representation of your community. By securing the necessary admin permissions and following the outlined steps, you can easily make this update, enhancing your Page’s effectiveness and clarity. Always ensure you have the right access before starting the process to avoid any delays.